|
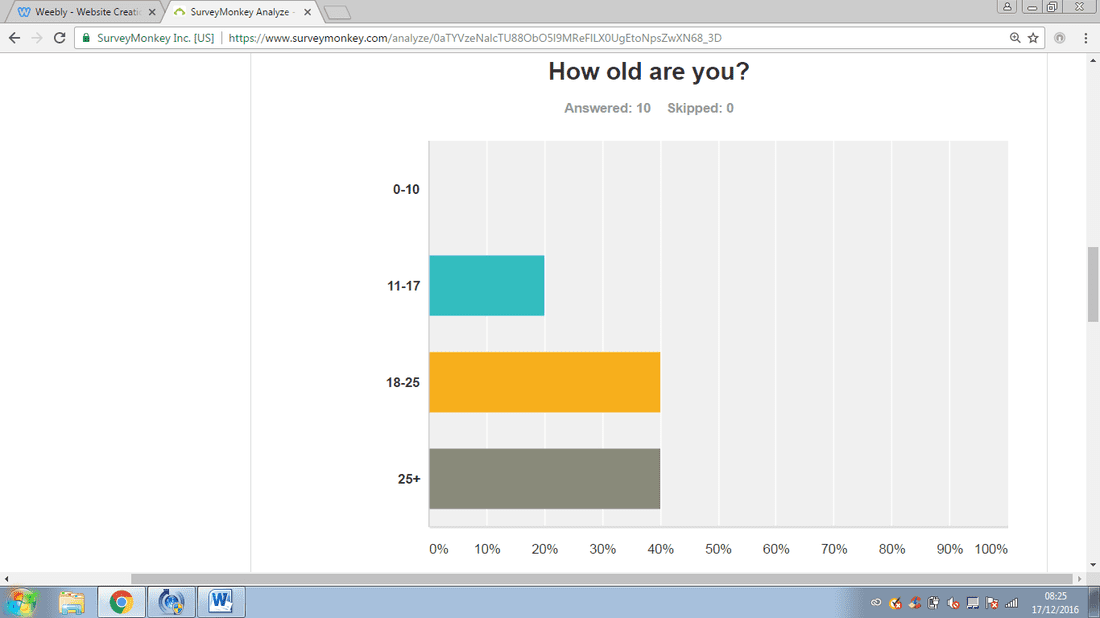
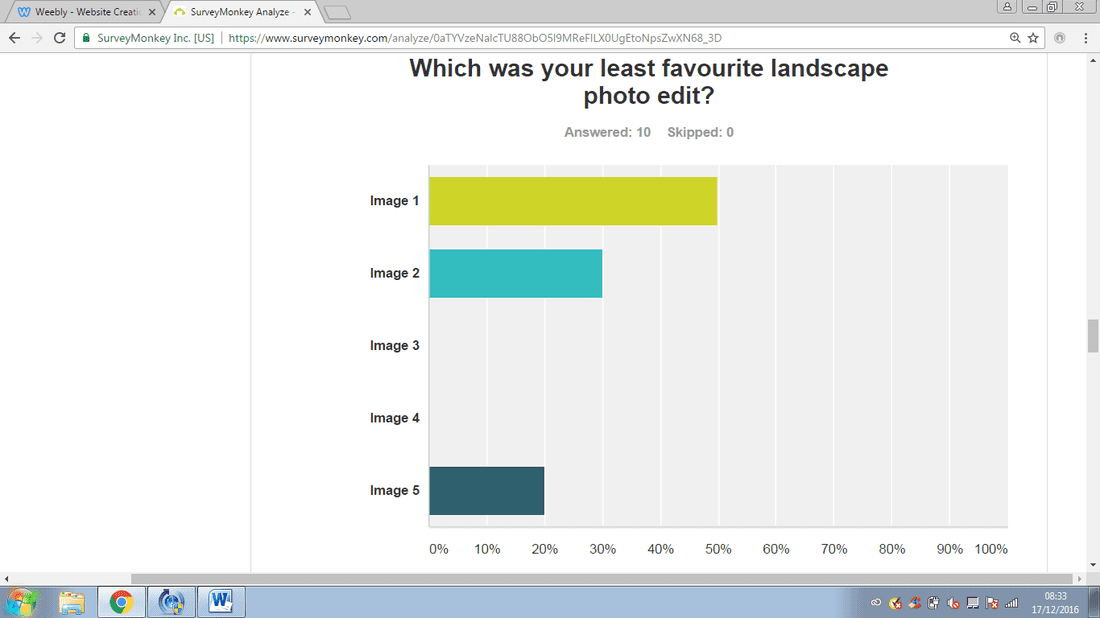
I made sure to get 10 people to do this survey, I did this by sharing it on social media (Facebook) that way it was people's choice if they did it or not rather than being forcing. Meaning their answers would of been more passionate and the people answering was random. I asked relevant questions to get feedback on my photography work. From the results I can see that the majority of people swayed towards a certain photography in the multiple choice questions. I can also see that more females did this survey than males and the majority of people who ansered it were over the age of 18 years old. I have to bare in mind that gender and age may have influenced the answers, but at least it helps me to see the target audience.
Improvements for future surveys: Next time in my survey don't write a question where I need to have a box for people to write in because due to laziness not everyone wrote in it. Also I can't create graphs unless it's a multiple choice question. The only advantages of this is everyone's opinions are different and I can learn from the constructive criticisms.
0 Comments
All throughout taking and editing my photos I tried to show a wide range of skills despite it not being my strongest area of media. I took 100 photos on a Canon EOS 600D (DSLR camera) and edited my favourite portraiture 5 photos in Adobe Photoshop CC. Strength of mine was I could easily think of ideas when it came to thinking of what images to take. I made sure I kept to my proposal and brief and therefore kept the photos music themed as if they were going to go into a music magazine.
Landscape photography is a scenic/establishing shot taken in landscape rather than portrait, which could be anything from urban city life to the rolling hills of the countryside. Photography techniques used during these types of shots for example low and high aperture to give the photo a different atmosphere. I went to Manchester to take some urban landscape photos in order to promote the city. I set the camera to manual and experimented with different camera settings to give the photos different effects. We visited Manchester on Sunday 11th December, in order to take a wide range of urban photographs. Within the city, we visited many of the diverse locations in which I had originally desired to visit. Places we visited included Manchester Town Hall, The Urbis, The Christmas Markets, Old Trafford Football Stadium and Piccadilly Gardens. This allowed me to take a range of photographs that demonstrate the diversity and multi-cultural areas of the city. Modern aspects include the Football stadium and The Urbis, in contrast to the older developments, which include the Town Hall. We took hundreds of photos; I choose my favourite five and edited them in Photoshop. I managed to stick to the proposal since I had a lot of time and no transport issues. Image 1: I only tweaked this photos colour, as I wanted to keep the overall atmosphere of the photo. I did this so it looked less dull and the shapes stood out more. I made it more vibrant, however in doing so the yellows became prominent so I adjusted it as best as I could using the colour balance tool. Sometimes less is more when it comes to editing photos. The shot itself was taken outside The Urbis building and includes a few buildings overlapping each other. It was taken around 4pm when the sun had already begun to set; this is why the photo is slightly dark which is the effect that I wanted. Despite this I could of improved the photo by having the camera slightly more in focus and well as adjusting the ISO slightly higher. I could have also taken this photo from a better angle, probably a lower angle. Image 2: Seen as the photo looked dreary to begin with I thought why not go all the way and turn it black and white. I did this by decreasing the saturation; I also increased the vibrance by half way, as I wanted the outlines of buildings pop. At first I increased the vibrance too much to the point where there was too much white noise so I had to tone it down quite a bit. I went with a dramatic theme for the photo, since the shot already looked dull I just made it look even duller. I then decided at that point that I wanted to make it look old fashioned (from the 70's & 80's). I used the cloudy weather to my advantage in order to achieve a better edited image than my original. I could of improved taking this photo by not including as much sky in the shot, hence why I cropped it, which makes it look more like a banner. To improve this shot I should have the lens more in focus and increase the ISO up. I took this photo onto top of the car park of the Manchester Evening Arena (MEN). Image 3: In this photo the light was working with us to create some amazing shadows and the sunset itself is beautiful. I turned up the temperature in the RAW image file to make it look even more brighter, giving it that warm feel. I also added a lens flare, due to the exaggeration of the bright light for added effect. We took this photo from Media City of The Imperial War Museum in Salford Quays meaning it’s a highly zoomed in shot. This lowers the quality slightly, as you can see the edges of buildings aren't as sharp, however this also party was because the camera should have been a bit more focused. I love have perfectly this image captures the sunlight. Image 4: As the sun started to set I used the light to my advantage as it created a shimmering flow on the buildings. My aim was to make these modern buildings look old fashioned by changing the colour and texture of the photo. To do this I turned the photo to colourized, turned the hue down to 25, turned the saturation down to 20 and adjusted the lightness accordingly. Now that the photo is the right colour I wanted to add the texture to it, to do this I duplicated the layer and drag and dropped an image of an old piece of paper. I then adjusted the size so that it matches up with the photo and turned down the opacity level to make it transparent. This photo was taken at Salford Quays of the Imperial War Museum. I think this photo looks pretty nice by itself without the need for editing it but I did anyway, therefore I think the only way I could improve this is to possibly take it from a different angle. Image 5: This photo was purposely taken out of focus to add bokeh. I played around with the colour in Photoshop to achieve this this look of a lot of the colours resulting in the opposite, give the photo a different atmosphere and therefore a whole different feel. There are a lot of blue in the edited image, this gives it a cold feel to it. The only thing, which doesn’t look realistic in the edited photo, is the publics abnormally blue faces. To improve this edit I could of adjusted the colouration in peoples faces by using the brush tool. There is a slight bit of white noise after I edited this photo as well, I could have took my time to remove it in order to make it more visually appealing. To improve the actual photo itself I could of kept the bokeh in the background but made sure the objects closer to the lens was in focus. This is taken just next to Piccadilly Gardens on the stairs of the tram stop. Overall I enjoyed this unit more than I thought I would and would happily do it again. All throughout taking and editing my photos I tried to show a wide range of skills despite it not being my strongest area of media. I took 100 photos on a Canon EOS 600D (DSLR camera) and edited my favourite portraiture 5 photos in Adobe Photoshop CC. Strength of mine was I could easily think of ideas when it came to thinking of what images to take. I made sure I kept to my proposal and brief and therefore kept the photos music themed as if they were going to go into a music magazine.
Image 1: The first image you see on my blog post is quite simplistic. To edit this photo I increased the temperature and tint in the RAW file to give this a warmer feel. I also increased the vibrance to +100 and the saturation to +20 in Photoshop. I wanted to make the colours pop, in order to make the image stand out more to readers of the magazine. My friend Amber G's hair really stands out now and the background as its gone from white to purple. I used the blur tool to blur out the studio light so all the focus is drawn to Amber in the photo. I took this photo while she was whipping her hair back and forth to give the impression that she is rocking out to her music. I could improve this photo by slowing down the aperture so it all blurs together. I could improve this edit by creating a smoke effect in the background. Image 2: In this photo I increased the temperature to 15000 in the RAW image file to make the photo feel warmer and brighter. It makes my friend Amber W's hair look more vibrant, it helps that the studio light is situated behind her. I turned up the brightness to 53 and I turned up the contrast to 42. I used the spot healing brush and smart blur tool to get rid of spots and blemishes giving Amber W that smooth flawless skin. I cropped the image to get rid of the excess background, which changed it from a landscape to a portrait. I could of improved taking this photo by having better lighting conditions since the photo looks slightly dark. Instead of having the studio light behind her I should of had it to the side or turned up the ISO. I already used the flash while taking the photo to create extra light but it appears that in this circumstance it still wasn't bright enough. I could improve this edit by taking my time to make the skin tone a little more even and perhaps add an interesting background to it. Image 3: During the photo editing process I increased the temperature in the RAW image file to 26000 to give it a warm feel and to empathize the lighting so it looks of better quality. I added a layer to add a background in to make it look like Amber G is singing on stage and therefore has a crowd. I decided to turn the image black and white as both the images lighting didn't match up so I had to improvise, it also adds a more dramatic atmosphere. I could improve this photo by shooting it from a more convincing angle. I could improve the edit by making Amber less rough when around the edges when I used the quick selection tool. Image 4: In the RAW image file I set the following settings: temperature 5300, tint -1, exposure +0.95, contrast +12, highlights +8, shadows +5, whites +10, blacks +10, clarity -18, vibrance +10 and saturation +4. In Photoshop I used the spot healing brush on her forehead which got rid of a small spot and made her skin more even tone since the top of her forehead was shiny. I also used the spot-healing tool on the computer screen to make it look more presentable to get rid of the dirt and reflection and on her bra line. I wanted to black out the windows to give this photo a more of a professional studio effect. I did this by using the quick selection tool to highlight the windows and once I removed those sections I filled it in with black. I made this photo black and white to dramatize it, I adjusted the black and setting colour settings to the highest so it was bright because I wanted a faded news-paper print effect. I wanted to spice up the image a bit so I decided to add selective colour to Thaheema's jacket. This made it more interesting and therefore visually appealing. In order to do this I carefully coloured in her jacket with the brush tool and then used an overlay to more the colour that I used more transparent so the original texture is visible. This skill required some careful precision to make sure I didn't go over the lines. I used this more slightly complicated method compared to using the quick selection tool on the jacket because it was too awkward to get in-between every fine detail such as the wires in the way. To improve this photo I could of used better lighting. To improve this edit I could reduced the white noise and grainy effect by adjusting the colours differently. Image 5: In Photoshop I used the spot healing brush in order to get rid of a couple of minor blemishes to make sure Amber G is looking immaculate. I used the quick selection tool to cut out her from the white background and I pasted her onto another layer, which was the stage background. I attempted adding smoke in the background however I found it ruined the simplicity of the photo and therefore removed that from the finished edit. I want to give a rock star effect so that it looks realistic. I made sure that the pose that I asked her to do was relevant as well. To improve this photo I could increase the ISO to add more light and thus would bring out more detail. To improve this edit I could of took my time on it to get rid of Amber's red cheeks. I could do this by using the clone tool on her skin that isn't red and therefore the models skin would be more even tone. Overall I enjoyed this unit more than I thought I would and would happily do it again. All throughout taking and editing my photos I tried to show a wide range of skills despite it not being my strongest area of media. I took 100 photos on a Canon EOS 600D (DSLR camera) and edited my favourite portraiture 5 photos in Adobe Photoshop CC. A strength of mine during this was that I knew how to use studio lighting to my advantage. I chose my favourite five photos and edited them so they would be suitable for a music magazine as the brief states and at the same time stuck to my propsal. On Tuesday 14th Decemeber me and my friends heading into the college photography studio to take 100 music related photographs. To add variety I took some photos in the sound recording studio, I placed my friends in different positions in order to make them look more professional.
The first image you see on my blog post is quite simplistic. To edit this photo I increased the temperature and tint in the RAW file to give this a warmer feel. I also increased the vibrance to +100 and the saturation to +20 in Photoshop. I wanted to make the colours pop, in order to make the image stand out more to readers of the magazine. My friend Amber G's hair really stands out now and the background as its gone from white to purple. I used the blur tool to blur out the studio light so all the focus is drawn to Amber in the photo. I took this photo while she was whipping her hair back and forth to give the impression that she is rocking out to her music. I could improve this photo by slowing down the aperture so it all blurs together. I could improve this edit by creating a smoke effect in the background.
In this photo I increased the temperature to 15000 in the RAW image file to make the photo feel warmer and brighter. It makes my friend Amber W's hair look more vibrant, it helps that the studio light is situated behind her. I turned up the brightness to 53 and I turned up the contrast to 42. I used the spot healing brush and smart blur tool to get rid of spots and blemishes giving Amber W that smooth flawless skin. I cropped the image to get rid of the excess background, which changed it from a landscape to a portrait. I could of improved taking this photo by having better lighting conditions since the photo looks slightly dark. Instead of having the studio light behind her I should of had it to the side or turned up the ISO. I already used the flash while taking the photo to create extra light but it appears that in this circumstance it still wasn't bright enough. I could improve this edit by taking my time to make the skin tone a little more even and perhaps add an interesting background to it.
During the photo editing process I increased the temperature in the RAW image file to 26000 to give it a warm feel and to empathize the lighting so it looks of better quality. I added a layer to add a background in to make it look like Amber G is singing on stage and therefore has a crowd. I decided to turn the image black and white as both the images lighting didn't match up so I had to improvise; it also adds a more dramatic atmosphere. I could improve this photo by shooting it from a more convincing angle. I could improve the edit by making Amber less rough when around the edges when I used the quick selection tool.
In the RAW image file I set the following settings: temperature 5300, tint -1, exposure +0.95, contrast +12, highlights +8, shadows +5, whites +10, blacks +10, clarity -18, vibrance +10 and saturation +4. In Photoshop I used the spot healing brush on her forehead which got rid of a small spot and made her skin more even tone since the top of her forehead was shiny. I also used the spot-healing tool on the computer screen to make it look more presentable to get rid of the dirt and reflection and on her bra line. I wanted to black out the windows to give this photo a more of a professional studio effect. I did this by using the quick selection tool to highlight the windows and once I removed those sections I filled it in with black. I made this photo black and white to dramatize it, I adjusted the black and setting colour settings to the highest so it was bright because I wanted a faded news-paper print effect. I wanted to spice up the image a bit so I decided to add selective colour to Thaheema's jacket. This made it more interesting and therefore visually appealing. In order to do this I carefully coloured in her jacket with the brush tool and then used an overlay to more the colour that I used more transparent so the original texture is visible. This skill required some careful precision to make sure I didn't go over the lines. I used this more slightly complicated method compared to using the quick selection tool on the jacket because it was too awkward to get in-between every fine detail such as the wires in the way. To improve this photo I could of used better lighting. To improve this edit I could reduced the white noise and grainy effect by adjusting the colours differently.
In Photoshop I used the spot healing brush in order to get rid of a couple of minor blemishes to make sure Amber G is looking immaculate. I used the quick selection tool to cut out her from the white background and I pasted her onto another layer, which was the stage background. I attempted adding smoke in the background however I found it ruined the simplicity of the photo and therefore removed that from the finished edit. I want to give a rock star effect so that it looks realistic. I made sure that the pose that I asked her to do was relevant as well. To improve this photo I could increase the ISO to add more light and thus would bring out more detail. To improve this edit I could of took my time on it to get rid of Amber's red cheeks. I could do this by using the clone tool on her skin that isn't red and therefore the models skin would be more even tone.
 I found this image on: https://uk.pinterest.com/class4365/tech/
Urban Landscape Proposal
I am going to going into Manchester City Centre and take some urban landscape photography in order to promote it. I will do this at various times throughout the day, one during the morning (9am), afternoon (1pm) and evening (7pm) when it gets dark to show the different light conditions. I will use different camera settings such as aperture to change the depth of field in order to give it more bokeh. I will make sure the camera is not on automatic rather than manual. I will take photos of a wide variety of buildings, from old to new. These will include Manchester Cathedral, The Urbis, Piccadilly gardens, Castlefield (by the fort), The Printworks, Town Hall, The Hilton Hotel, The Christmas Markets, Manchester United’s Football Stadium, Manchester City’s Football Stadium and The Central Library. I will head up to the grassy hill that over looks quite a lot of the city. I’m also hoping to go inside the Urbis and go to the top floor to take a bird’s eye view photo of that side of the city. That way I get some high and low shots to compliment each other. My aim of this project is to capture the beauty of Manchester take as many photos as possible and choose my favourite ten to put on my blog. My target audience is anyone of adult age who is interested in this style photography. I will take an umbrella with me when I go into Manchester to take photos therefore if it’s raining during the day I am out then not only will I check dry but it will also protect the camera against the elements. The cameras aren’t waterproof therefore if exposed to, too much rain they will no longer function properly. Risk Assessment I have to take into account the weather on the day, if its raining it may damage the camera. In order to prevent unexpected rain I will bring an umbrella. I will always keep the camera around my neck just in case I drop it so I don't damage it. I will put the camera away when i'm not using it since I will be going to a city which can be quite rough and dangerous. Portrait Photography Proposal I am going to take some portrait photos suitable for a music magazine. I will make some black and white to add more atmosphere such as drama. I want each photo to have different facial expressions to capture a wide vareity of emotions realted to the msuic industry. I will mainly take them in my colleges photography studio with the help of studio lights. To add variety to the photos I will also take some photos in the music studio to add that sense of professionalism. I need to focus on the lighting used such as natural light, artificial light such as ISO and flash. I will achieve the right amount of shadowing with the lighting, which will again add more atmosphere to the photo. Risk Assessment There might be wires on the studio floor which is a trip hazard, in order to prevent this I will remove and lose wires lying around by putting them to one side. I have to take into account if any of the models have epilepsy or are light sensitive then I have to use artifical lighting such as ISO rather than flash. A dark room is a room where photographs are developed from negatives which you find on film. In this room the temperature is controlled and where no normal light is allowed in, in order for the photographs to develop correctly so they arent overexposed as the photographic paper is light sensitive. Dark rooms typically red or sometimes yellow and three different chemicals are used mixed together with water in order in order to develop the photos.
Dark Rooms VS Digital Photography Dark room photography is time consuming whereas if you take a photo with digital photography its instant so you can look at it there and then. A good qaulity DSLR camera is quite expensive, however if you take a lot of photos then it would save you more money in the long term as you need to keep on buying chemicals and printing paper for dark room photography. Disadvantages to both are that with Digital photos not only do you need a device to save them onot but also if that gets corrupt then you might lose them. Disadvantages with dark room photos are you would need a big enough space to store all of them since they are physical and even then there is a risk of them getting damaged, for example water or fire damage. The qaulity is also better with digital photogrpahy, the image is sharper ans the colour is more vibrant.  The first step of planning what photos to take involved brain storming ideas in a easy to read mind map format. I then based my proposal around this by expanding or improving these ideas. Lastly, once the planning was done, I was able to actually go out and take photos, trying my best to stick to the plan.
|
Archives
January 2017
Categories |


 RSS Feed
